Saturday, April 9, 2011

Line Creatures


In the beginning of the year I usually do a line lesson with each grade level. In kindergarten we learn the names of the lines and how they are used to embellish and add to our works of art. Each year we review the lines and go a step further to discuss repetition, pattern, line direction, design etc.


This line creature lesson was inspired from Deep Space Sparkle. I chose a different animal for each class. This was their first project. This lesson was a great following direction lesson as well because I taught them step by step how to draw their animal using my "document camera".


Students used sharpies to draw animal and decorate inside with line and patterns.


Then students the cut out their animals and glued on top of a piece of 12x18 color construction paper


Tuesday, April 5, 2011

Clay Tropical Fish


This lesson was inspired from a piece of pottery in our school counselor's office. I just loved it so and developed a lesson for it. My fifth graders really enjoyed the process, especially the results.


Student's rolled a slab and wrapped it around a roll of newspaper (which I later took out. Some newspaper wouldn't come out so I let it burn in the kiln) . They scored and slipped the slab together. Using scrap clay they made pieces for their fish, such as eyes, fins, flippers, tails, and even tongues. These were also scored and slipped on.


Clay fish were glazed with Speed Ball glazes, using different colors. Some printed with q-tips to give their fish polka dots. These just make me think of the beach!


Kindergarten Flower Prints


This is great one day project for Kindergarteners. I got this idea from http://www.deepspacesparkle.com/ With this lesson we discuss what a still life is. I show them Vincent Van Gogh's Sunflowers and we talk about how he uses his flowers to fill up the space. He has tall flowers, big flowers, flowers that overlap and that are different sizes, and flowers that go in different directions. Student's always mention the flower bud that droops down.


Next I pass out a 6x4.5 inch piece of construction paper to everyone. I give them random colors. They never complain what color they get it, lets face it Kinders just are happy to get to create something. They fold the paper in half and cut an interesting line up to make a symmetrical vase. They love this!! After it is cut out then they glue the vase at the bottom of a 12x18 sheet of white drawing paper.


I wanted to share with you how I use paints with my younger classes. I have an empty table up front next to my technology chart. With masking tape I tape a line around the table. I then place my paint containers with paintbrushes inside around the tape. I demonstrate that students can use one color at a time to take back to their seats, and when they are finished they are to put the paint back behind the "MAGIC LINE". I explain that it is so magical because if their paint is put behind it wont fall off the table and others can pick it up safely. Students are not to take colors from others, but are to only pick them up from the table. This idea has worked perfectly for 10 years.

Next student are to paint four circles (different sizes)above their vase. On their table I have sponges cut up for PRINTING the petals. These are cut in rectangles, squares, circle, traingles, tear drop,etc.


Students are to print around the circles with the sponges, one color at a time. Then with a another color paint a different sponge and print another flower. Soon the flowers will start overlapping, which makes the still life Gorgeous!


You are probably thinking. Won't the sponges get painted with different colors? Yes they will, which actually mixes the paint alittle and works just fine.


Also these classes needed not to even add stems. The flowers overlapped enough.


At the end of class students write their name in the vase just like Vincent did himself.


Happy printing!

Fourth Grade Face Pots


In fourth Grade every year we discuss North Carolina pottery. Students are most entertained with face pottery and get super excited when they get to make their own. Prior to activity we looked at a power point presentation of NC face Jugs and other various examples of NC pottery. We discuss why and where face jugs were made hundreds of years ago, how they originated in the North Carolina, and what purposes are they for made today.


This year I decided to give my students the choice to leave the pot up or lay it over so the lid could serve as the mouth. Some choose to make human funny faces and others made animals.


  • My classes first started with a ball of low fire white clay and created a pinch pot.

  • using needle tools and wet clay they scored and slipped their facial parts on.

  • pots were left to dry several days and then bisque fired at a cone 04.

  • Next class period we glazed with Speed Ball glazes and glazed fired at a cone 05.

  • Some classes glazed with color glazes and others used clear glaze only. Both results were fabulous.
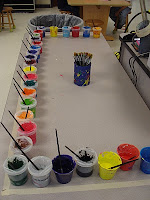
Bone dry and ready to fired in the kiln

They all anxiously wait..to be heated.


This cat pot has been glazed with clear glaze


All pots are glazed and waiting for the final firing.


This pot was fired with clear glaze


I Just had to take a profile picture of this pot. This student used a tool, almost like something used with play dough, to extrude clay strands for the hair. Again this was done in clear glaze

These pots below were made sitting up so they could be used more functionally. These girls also decided on animals for their inspiration. I love them both.

Sunday, April 3, 2011

Fourth Grade Weaving


This lesson was a favorite among my fourth graders. We used various kinds of fibers and discussed different techniques of weaving. This lesson took about 5 weeks

Show Case of Stars Polenta Display


This is a great overview of some student art work from this year.

Kindergarten Roller Coasters


This one day lesson is by far the best to do with Kindergarten. I have been doing this for ten years. Every year teachers look forward to seeing their students walk back to class carrying these super colorful paper sculptures.


This lesson is usually done on the their third day of art after they have learned all about lines the week before. We review the names of the lines before getting started and I then discuss that we will be making lines come off the paper. This is great lesson to mention 3-dimensional art and sculpture. I also teach how to use a glue bottle in art class. How to open it and how much to use. "Just a dot not a lot".

Objectives:
  • Understand and follow step by step presentation of art activities
  • create by using imagination
  • use art tools safely and appropriately. glue (just a dot not a lot)
  • identify types of lines from previous lesson


Materials:


  • 12x9 Black construction paper (Because my school is so big and we have so many kindergarteners I have had to use smaller paper. Years ago we used 12x18 paper. Both work)

  • 1 inch paper strips

  • glue bottles

Demonstrate how to fold, curl, zig zag, etc the paper to look like lines. Strips can go under, over, and through other lines. Students start off with four different color strips and when they are finished they can get more.


I demonstrate first how to add a small dot of glue on the ends of the strips and how to pop up and hold down on the black paper for 10 seconds. I tell them that in order for your strips in stay we must count to ten out loud. It's the magic trick. All throughout the class students are counting. It is adorable!


The more rollers coasters they add the better. This is a great lesson in building and incorporates so many art concepts. At the end of class kindergarteners line up with their rollers coasters and take home. Before they leave I show them how to hold going down the hall, sitting at car pool and on the bus. This lesson is a must!